Introduction to Google Tag Manager: The Basics

When you integrate external services to your website to measure its performance or that of the advertising campaigns that you have launched, you generally have to juggle a large number of code snippets.
This requires, in addition to a certain programming know-how, a good overview. If it is not possible to access the code base directly, you must communicate with the responsible programmer each time that new analysis and monitoring services are implemented.
To counter this, Google released years ago the Google Tag Manager which greatly simplifies the integration of different codes.
Summary
- What is Google Tag Manager?
- How exactly does Google Tag Manager work?
- Tags, triggers and variables: the basic components of Google Tag Manager
- Integrating code snippets with Google Tag Manager: the advantages
- Tutorial: using Google Tag Manager for your personal web project
What is Google Tag Manager?
Google launched in October 2012 its internal management system for the integration and administration of JavaScript and HTML tags.
While the first version was mainly designed for the solutions developed by Google, namely Analytics, AdWords and DoubleClick, the tag manager supports an increasing number of third-party tags since version 2 (2014), thanks in particular to the release of the official API.
Google Tag Manager is not limited to the implementation of analysis and conversion tools: Remarketing and Affiliate tags as well as test tool snippets such as AB Tasty or Mouseflow (Heatmap tool) can also be integrated into your project (websites and mobile applications) using Google Tag Manager.
Note
You will find the official list of supported tags in the Tag Manager Help forum.
How exactly does Google Tag Manager work?
Well Google Tag Manager is used to connect a website or an app with tools of all kinds quickly and easily thanks to its tag system.
And these tools can be: web analytics, measurement of digital marketing campaigns (sponsored ads, remarketing …), optimization of the user experience, heat maps, A/B tests, etc.
These are just a few examples of all the tools you can use with tags through Google Tag Manager:
➤ Google Analytics : web analytics tool (the one I have connected in GTM for this blog and I am going to explain how to do it step by step)
➤ Google AdWords : tool to launch sponsored search campaigns in Google searches (SEM), display ads, video ads, mobile apps, etc.
➤ DoubleClick by Google : advanced and very complete tool to manage digital advertising campaigns of all kinds and in detail.
➤ Google Optimize : tool for optimizing the user experience with testing A / B experiments, etc. (I have to try this one!)
All implementations are then done through the web interface from Google Tag Manager. The snippet container functions as a central location from which all the tags that you configure via the browser interface are set up.
Subsequent changes can also be made directly in the Tag Manager. If you never need a tag anymore, just delete it from the container.
Tags, triggers and variables: the basic components of Google Tag Manager
In order for the snippet container to capture the interactions and information desired by the user and transmit it in the correct way, you must create the appropriate tags and triggers in your Google Tag Manager.
Variables can also be used to specify these two basic elements of the Google tool. For the three components, there are different ready-made models, but you can also make your own settings if necessary. Below shows you exactly what the tags, triggers and variables do.
Tags
Tags are the units at the heart of Google’s tag manager. They are in the form of code and determine what information is sent to which places.
In principle, tags are nothing more than code snippets that you could include yourself in HTML code. In addition to the standard tags, there are specific JavaScript tags that do not pass information, but fire additional tags.
However, Google Tag Manager generally loads all the tags contained in a container independently of each other and in parallel with the other elements of the website.
An intelligent caching mechanism optimizes the number of requests that the web server must respond to.
Trigger
In Google Tag Manager, you use triggers to define the conditions under which a particular tag should come into play. More specifically, it is a question of what actions or events the user is driving when a code is executed, that is to say when it is “triggered”.
It can be simple page views, loaded windows or the appearance of error messages, but also clicks of visitors on a specific button.
You can of course also set as a tag trigger the filling of a form, the subscription to a newsletter or the viewing of a video. The same trigger can be used for several tags.
Variables
If you want to refine the parameters of the defined tags and triggers, you can use the variables in the tag manager. For tags, variables offer the possibility of entering dynamic values.
If, for example, for an online store, information such as the transfer of purchased products must also be tracked, the variables can be used. It works very similarly with triggers; variables are used to specify them.
While you can define for example exclusively with a trigger that a tag should be executed when a page is called, you can use a variable to specify exactly which page (s) or URL (s) it should be ‘to act.
Integrating code snippets with Google Tag Manager: the advantages
Google Tag Manager is essential for anyone who works with different tracking and analysis tools for various purposes. Here are some of the benefits of Google software:
- Tag caching minimizes server requirements and shortens the loading time of websites.
- Source codes are optimized to a minimum.
- The integration and administration of all tags is easy and convenient via a single web interface after a simple access to the source code.
- Continued blocking of unwanted snippets or types of snippets increases the security level of your website / web application.
- Different ready-made templates for tags, variables and triggers are available.
- Automatic tag verification with preview and debug mode.
- Record all tag activity and changes to Google Tag Manager account settings.
Tutorial: using Google Tag Manager for your personal web project
How do I use Google’s tag manager for my website or app now? Because the tag manager is web-based, no installation is necessary; you can access the interface via any standard browser.
There are also no user fees, so you can get started right away. The only prerequisite is to have a valid Google account . If you already use services such as AdWords, Gmail or Google Drive, you already have an account, if not, you will have to go to create a Google account to then be able to access Google Tag Manager.
Step 1: Configure your Google Tag Manager account
Go to the Google Tag Manager page and sign in with your Google Account to start setting up the manager . A new menu will open automatically, allowing you to add your Tag Manager account.
To do this, enter the name of the desired account and the country in which you are located. Click on the “Continue” button to confirm the data entered.
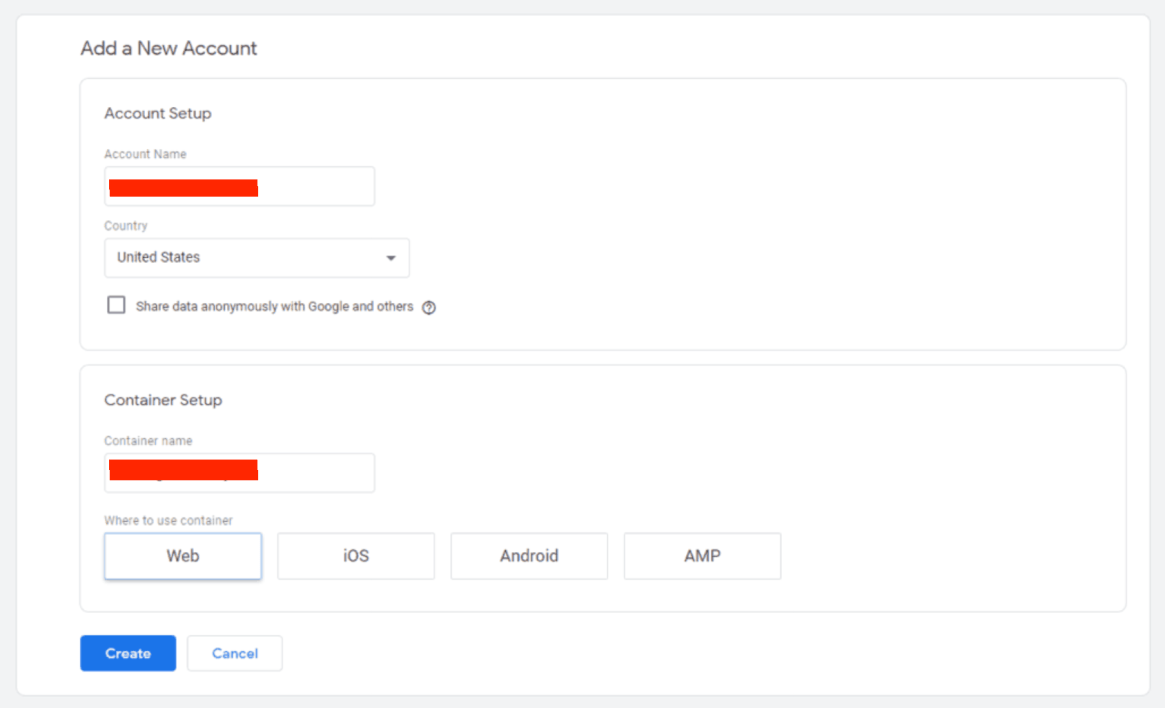
When you check the box “Share data anonymously with Google and third parties” when creating your Google Tag Manager account, you activate the benchmarking function, which compares your performance with that of competing web projects.
Step 2: Install the container
Then create the container in which you will later insert your snippets. First choose a name. For a website, it’s useful to use the URL here, especially if you plan to manage different sites (each with its own container) via the Tag Manager account.
In principle, however, you have a free choice. To complete the creation of the container, specify the type of project (website, AMP or App) and click on “Create“.

Step 3: Integrate the Google Tag Manager container snippet
It literally takes seconds for Google to generate the snippets. If the process is successful, the tag manager will present the container snippet in two parts.
The first is simply integrated by a copy / paste in the header of your pages. The second is inserted in the same way in the “Body” space of the desired HTML document, directly after the opening tag: thus, you are sure that the extract will be loaded as soon as possible in order to provide the measurement data as precise as possible.
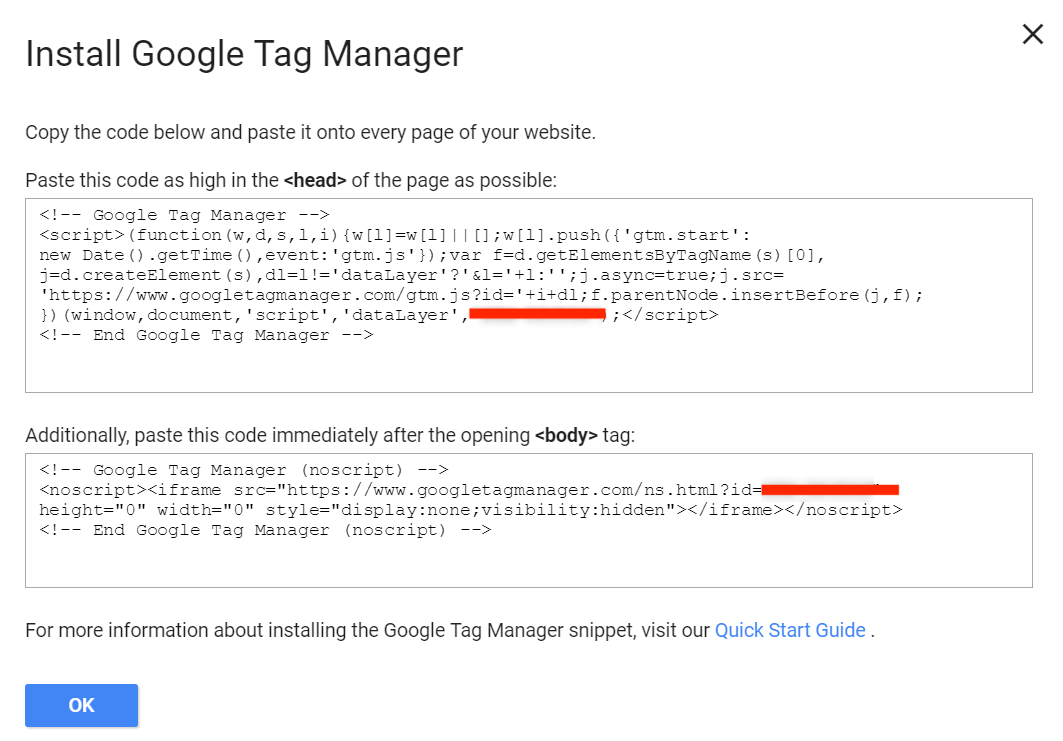
After linking your snippet from Google Tag Manager, the configured tags, triggers and variables become active.
Note: The Google Tag Manager code snippet can be retrieved at any time after this step. To find it, go to the “Admin” tab and click on “Install Google Tag Manager”.
Step 4: Add tags
Once you have integrated the tag manager code, you can start filling the container . The first step is to create the tags to implement the tracking and analysis codes in your website or application.
Simply go to your workspace via the tab of the same name and select “New tag” or “Add a new tag”.
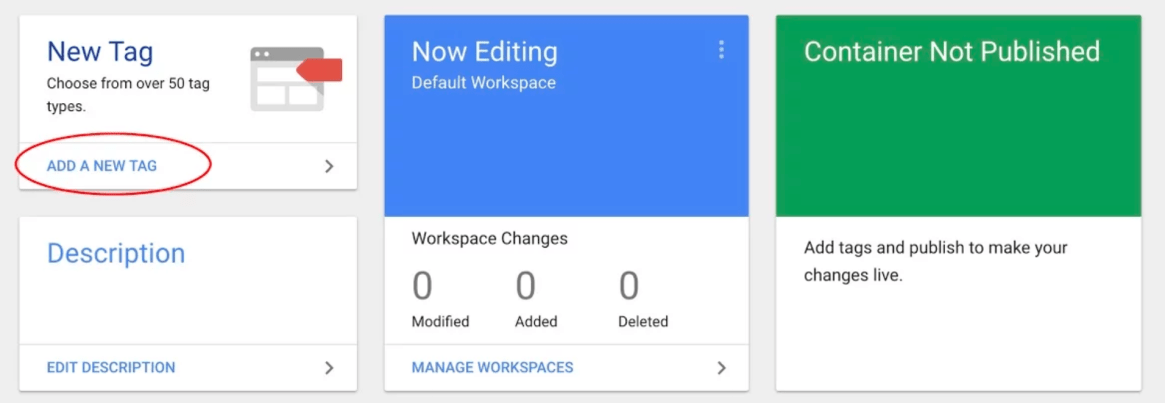
You can configure up to three workspaces in your Google Tag Manager and select different parameters (for example to test new tags, and, in case of doubt, to return to the original variant in one click).
Click in the “Tag configuration” option and select the type of tag that suits you. We will take as an example the “Universal Analytics”.
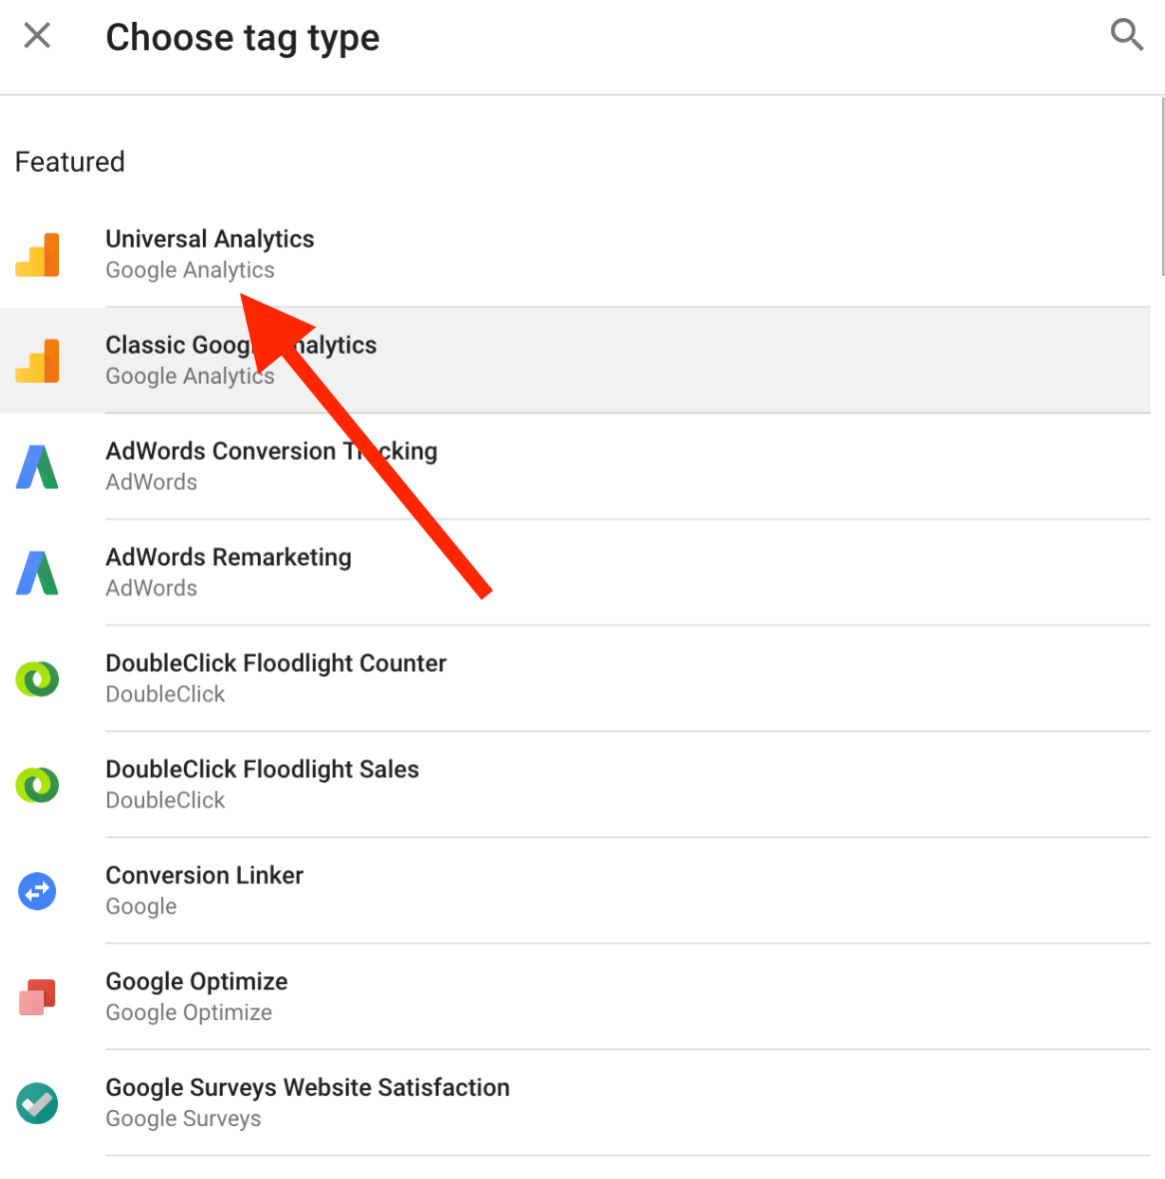
Further down the list of tag types, you’ll find the “Custom” section for custom HTML codes and image tags that are not supported by Google Tag Manager by default.
Then, you define what Analytics should follow (in this tutorial: “page view”), and check the box “Enable overriding settings in this tag” (necessary if you do not add a variable).
You can now enter the ID for your Google Analytics account following the corresponding line. To use Google Analytics respecting the privacy of visitors to your site and the confidentiality rules, add the field “anonymizeIp” under “More Setting” -> “Fields to Set” and insert the value “true”. Thus, the IP addresses registered by your web server will be transmitted to Google anonymously.
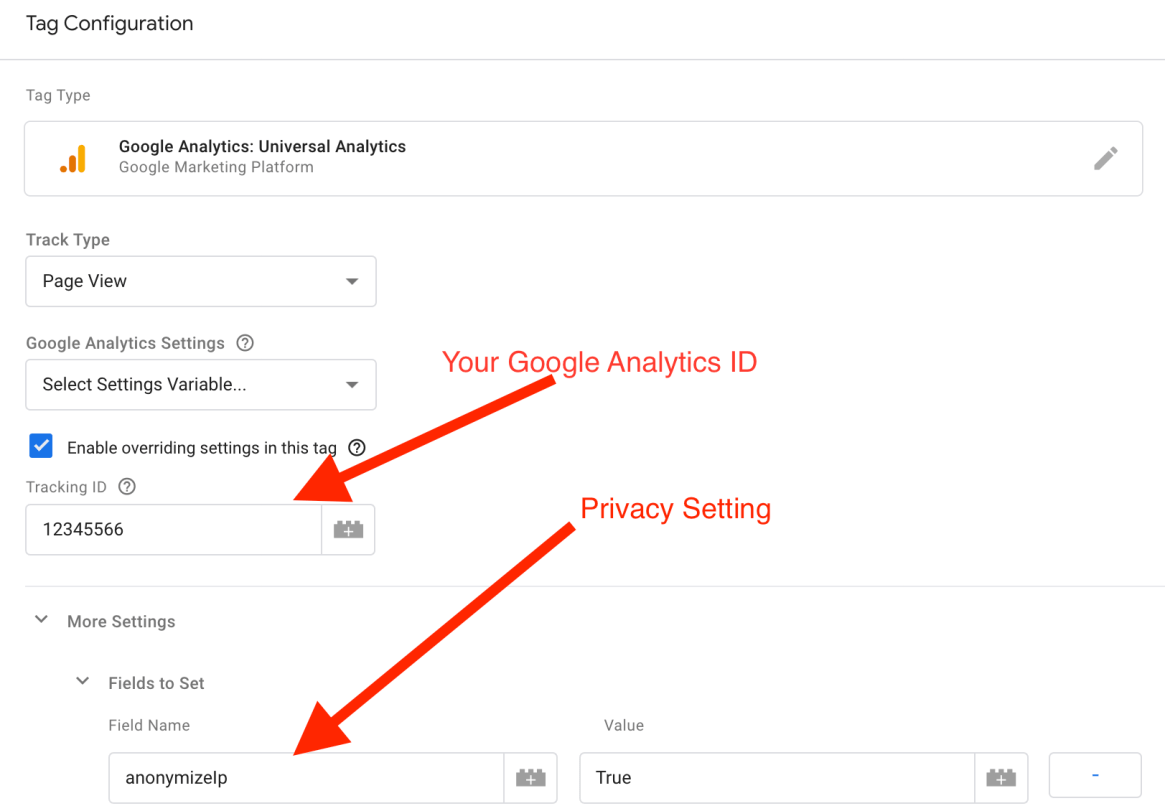
The accounts for the different analysis and tracking tools must be created separately: it is only if you have the appropriate IDs that you can integrate the services into Google Tag Manager.
Step 5: Add a trigger
Just before the tag is saved completely, Google Tag Manager offers to add a trigger so that the Analytics tracking code is read during the desired interaction. To create a new trigger, select “Triggers” from the left menu bar, then click “NEW“.

Click in the “Trigger configuration” field to have an overview of the types of triggers available. Find the one that suits you and click on the corresponding entry. If you need a trigger event for which there is no template, select “Custom event”. In this tutorial from Google Tag Manager, we will use the “Page view” trigger that was already determined as a follow-up target in the previous step. For this type, you can also specify whether this should apply to all views or only some.

Then select “All Page Views”. This will send a signal to Google Analytics that you want to track all page views across all pages of the website.

Step 6: Connect the trigger to the tag
Return to the tag created in step 4 using the left menu “Tags” and then select the desired tag. Click in the “Trigger” space and then select the trigger you want to associate from the list.

Choose your trigger to add it to the tag.
Step 7: Test the functionality of the tags created
Google Tag Manager gives you the opportunity to test the functionality of tags and built-in triggers (and possibly variables) before validating the publication. To do this, click on “PREVIEW“. After a short wait, the following message appears to indicate that the tag manager preview mode is active:

Preview mode in Google Tag Manager can be started and ended at any time.
If you’ve started preview mode, open your website in a new tab. At the bottom of the screen, the Google Tag Manager console opens, and you can see which tags have been executed under ” Summary“.
As we configured in this tutorial that the extract from Google Analytics should be read directly for page views, the console lists the Analytics tag under “Tags Fired On This Page “.
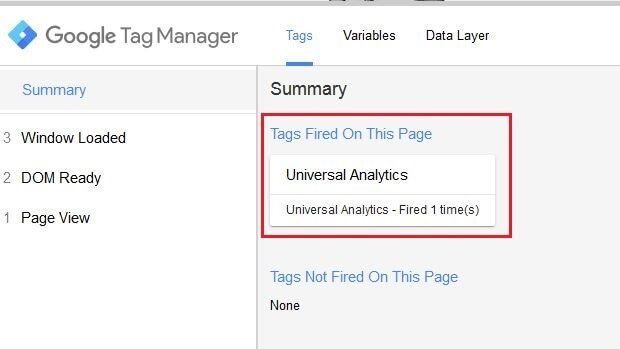
Important note: To test tags or triggers that require specific user interactions such as clicking a button, you must first perform the corresponding actions.
Step 8: Publish the container
If your container configuration works the way you want, it’s time to start it for your web project. To do this, you need to create a new version and publish it.
To start, click on the “Submit” button at the top right of the Tag Manager menu bar. Select the option “Publish and create a version”, name your version and possibly add a description (this is particularly recommended if you have many tags).

Detailed version descriptions make it easy to track fairly large Google Tag Manager accounts.
Click on ” PUBLISH ” to finish and finally launch your first Google Tag Manager version.
